Tuesday, February 23, 2016

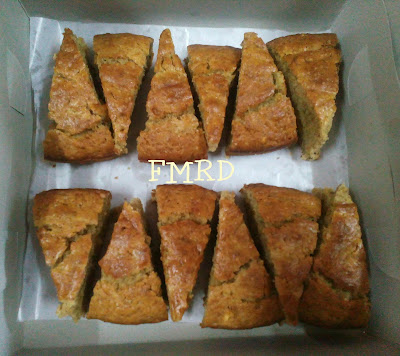
Basic Sponge Cake - Egg Free

Source:

Mrs. Sangeeta Jain


Ingredients:

Maida - 100 gm

Condensed Milk - 200 gm

Butter - 2 tbsp

Powdered Sugar - 2 tbsp

Baking Powder - 1/2 tsp

Baking Soda - 1/2 tsp

Aerated Water (Drinking Soda) - 100 mL

Vanilla Extract - 1/2 tsp

Salt - 1 pinch


Method:

Preheat oven at 180 degrees for 10 minutes.

Grease baking pan with butter and line with parchment paper.

Sieve together maida, baking powder, baking soda, and salt.

In a mixing bowl, whisk butter till soft.  Add condensed milk and whisk together.  Add vanilla extract and powdered sugar and mix together well until combined.

Add one-third of the maida and mix gently.  Add half of the drinking soda and mix.  Mix gently the rest of the maida and soda alternatively.

Transfer this batter to the prepared baking tin and bake at 180 degrees for 25 to 30 minutes or until a toothpick inserted in the middle comes out clean.

Cool and use.

Notes:

This basic sponge cake can be used as base for many flavored and iced cakes.  One best example is that it can be used to make eggless white forest cake.  I used Amul mithai mate (condensed milk).


Wednesday, February 17, 2016

Mullu Murukku

Source:

Mrs. Saraswathi Raj


Ingredients:

Roasted Rice Flour/Idiyappam Flour - 4 cups

Gram Flour - 2 cups

Roasted gram (pottukadalai) flour - 1/2 cup

Moong Dhal (payaru paruppu) flour - 1/2 cup

Salt - 2 to 3 tsp

Red Chilli Powder - 3 to 4 tsp

Asafoetida Powder - 1/4 tsp

Cumin Seeds - 1 tsp

Omam - 1 tsp (optional)

Butter - Lemon sized ball

Water - As needed

Oil - To deep fry


Procedure: 

1.  Mix all the flours together well.

2.  Add salt, red chilli powder, asafoetida, cumin seeds (jeeragam) and/or omam.  Mix well together so that all the ingredients are uniformly mixed all over.  Adjust salt and chilli powder according to your taste.

3.   Add butter to this mixed powder mixture and mix well with your fingertips all throughout so that a crumbly texture is formed uniformly.   You can around 50 to 60 gm of butter for this quantity.  Adding too much of butter will distort the consistency of the murukku, so beware.  Alternatively, you can heat up 1/2 cup of oil and add to the flour mix instead of butter (if you do not have butter or do not want to use it) and mix it up uniformly.

4.  Divide this flour mixture into 3 to 4 parts and keep aside.

5.  Take one part of the powder mixture and add water as needed by sprinkling little by little at a time to make a soft dough.  Make into medium sized balls for easy handling.

6.  Heat oil in a medium sized deep frying pan.  Drop a small ball of the dough to check if the oil is hot enough to fry the murukkus.  If the dough rises to the top immediately with a sizzle, the oil is ready for frying.

7.  Use your murukku mould fit with the star nozzle and greased with little oil on the inside.  Fill with 2-3 balls of the dough until 3/4th full and press the mould directly on hot oil (simmer the flame) spreading all over the kadai.  Deep fry till golden brown in color and the sizzling sound stops.  (Do not over fry, else it will get burnt.)  Repeat the same for the rest of the portions of the mixture.

8.  Drain in a tissue paper.

9.  Cool and store in an airtight container.


This recipe is one my mother-in-law taught us and her murukkus are so crispy and oil-free on touch.  She is a versatile cook and follows the traditional recipes that are tasty and healthy too.

Notes:

To make roasted Rice Flour - Wash and soak raw rice in water for about 1 hour.  Strain water and spread in on a cloth and allow to dry.  Do not allow to dry completely.  When it is half dry, machine it to a fine flour.  This step can be made at home by powdering the semi-dry rice in a mixer grinder and sifting it.  When the flour is still wet, roast the rice flour little at a time (say about a cup or 2) until the moisture is completely removed and the flour is dry.  Try drawing lines with this flour.  If you could draw the lines without a break, the roasted rice flour is ready.

Roasted Gram (Pottukadalai) Flour -  Powder the necessary quantity of roasted gram in a mixer grinder and sieve.  You can sun dry or roast for a while in a kadai to make the pottukadalai crispier and making powdering easier.

Moong Dhal (Payaru paruppu) Flour - Dry fry the moong dhal in a kadai till it slightly changes color.  Cool and powder in a mixer grinder.  Then sieve and use.

Saturday, February 13, 2016

Raw Banana Peel Stir Fry/Ethakka Tholi Thoran

Source:

Sachu's Kitchen


Ingredients:

Raw Banana Peel (finely chopped) - 1 cup

Buttermilk - 1 tbsp

Van payar/Thatta payar (Red Cow Beans) - 1 tbsp

Turmeric Powder - 1/4 tsp

Salt - 1 tsp

Grated Coconut - 2 to 3 tbsp

Green Chillies - 3 (medium)

Small Onions - 1 or 2

Cumin Seeds - 1/2 tsp

Curry Leaves - 1 sprig

Mustard Seeds - 1/2 tsp

Urad Dhal - 1/2 tsp

Asafoetida - 1 pinch

Coriander Leaves (chopped finely) - 1 tbsp

Oil - 2 to 3 tsp

Lemon Juice - Few drops


Method:

1.  Mix buttermilk with around 2 cups of water and wash the chopped banana peel in this.

2.  Strain and pressure cook the chopped banana peel, washed vanpayar, turmeric powder in little water for 10 minutes (3 to 4 whistles).

3.  Once done, strain off the excess water and keep aside.

4.  Grind together coarsely the grated coconut, cumin seeds, curry leaves, small onions, and green chillies.  Do not add water to grind.

5.  In a kadai, heat oil and splutter mustard seeds, ural dhal, and asafoetida.

6.  To this, add the cooked banana peel and beans.  Saute for a minute or so.

7.  Add the coarsely ground coconut mixture along with salt and mix well.  Cook for 3 to 4 minutes.

8.  Once done, switch off the gas and sprinkle chopped coriander leaves and lime juice and mix.

This is a best accompaniment for hot steaming rice.

This is a very common and famous dish in the Kerala cuisine.  Though you can use any raw banana peel, the peel of nendhran kaai is tastier when used in this recipe.


Wednesday, February 10, 2016

Eggless Wheat Carrot Cake with Raisins and Cashews

Adapted From

Fullscoops

Ingredients:

Carrots - 1-1/2 cups (freshly grated)

Whole Wheat Flour - 3 cups

Brown Sugar - 1-1/2 cups

Vegetable Oil - 3/4 cups

Milk - 1 cup plus 2 tbsp

Baking Powder - 1-1/2 tsp

Baking Soda - 2 tsp

Cinnamon Powder - 1-1/2 tsp

Nutmeg Powder - 1/2 tsp

Salt - 1/4 tsp

Raisins - 1/4 cup (chopped)

Cashews - 1/4 cup (chopped/broken)

Vanilla Extract - 1 tsp

Yield:

Approx 850 gm


Method:

1.  Wash and clean the carrots, grate them, and set aside.

2.  Preheat oven to 180 degrees for 10 minutes.

3.  Grease an 8 inch baking pan with oil/butter and line the base of the pan with butter/parchment paper cut to size.

4.   In the mixing bowl, add the vegetable oil and brown sugar.  Beat for a minute or so.

5.  Add in the milk and beat on high speed until the sugar crystals dissolve.  Add the vanilla and beat again.

6.  Sift in the flour, baking powder, baking soda, cinnamon powder, nutmeg powder, and salt.

7.  Fold gently with a spatula and also mix in the grated carrots, raisins, and cashews until well combined.

8.  Pour the batter in the greased pan and bake at 180 degrees C in a preheated oven for 30 minutes or until a skewer inserted in the center of the cake comes out clean.

9.  Remove the cake from the oven once baked and cool on a wire rack for 10 minutes and then invert the pan.  Cool completely and store.


Tuesday, February 9, 2016

Eggless Date, Honey, and Almonds Wheat Cake

Adapted from:

Umm Noora, CAL


Ingredients:

Cream Together:
Butter - 100 gm (at room temperature)
Brown Sugar - 1/2 cup
Honey - 1/4 cup
Vanilla Extract - 1 tsp

Dry Ingredients:
Whole Wheat Flour - 1-1/2 cups
Milk Powder - 3/4 cup
Baking Soda - 1 tsp
Baking Powder - 2 tsp
Salt - 1 pinch

Wet Ingredients:
Milk - 1/2 cup
Water - 1/2 cup
Thick Yoghurt - 1/2 cup

Dates - 10 (finely chopped)
Dates - 10 (soaked in just enough milk for 10 minutes and ground to paste)

Almonds (chopped) - A handful (approx 20 gm) 

Yield:

Approx 900 gm cake

Method:

1.  Preheat oven at 180 degrees C for 10 minutes.

2.  Grease baking pan with butter liberally and line the base with a butter/parchment paper cut to size.

3.  In a medium bowl, add all the wet ingredients and whisk them well.  Make sure they all are at room temperature.

4.  Sift together all the dry ingredients for at least 3 times to incorporate air and make the cake soft and fluffy.

5.  Deseed dates.  Chop finely the 10 dates (to be chopped, approx 100 gm) and mix to 2 tbsp of sifted flour to avoid sticking to each other.  Soak the rest of the 10 dates in milk for 10 minutes and grind together to a smooth paste.

6.  In the mixing bowl, add butter and beat until fluffy and creamy.  Add brown sugar and whisk at high speed until the sugar dissolves.  Add the honey and vanilla extract and beat well until combined.

7.  Once creamy, add half of the wet ingredients and 1/3rd of the dry ingredients and beat on low speed just until incorporated.  Add the rest of the wet ingredients and the next 1/3rd of the dry ingredients and beat only until incorporated.  Now, add the balance 1/3rd dry ingredients and the pureed dates and fold gently with a spatula.  Make sure there are no lumps.

8.  Now, add the chopped dates and mix again with spatula only until mixed together.  The final batter will be a thick, sticky batter, not to panic.

9.  Pour the batter into the greased pan and top with the chopped almonds
and press slightly to the batter.

10.  Bake in the preheated oven at 180 degrees C for 30 to 35 minutes or until a toothpick inserted in the center of the cake comes out clean.

11.  Remove from the oven and allow it to cool on a grill after 5 minutes.

12.  Allow to cool completely and slice and store.  The cake tastes better after 24 hours.


Notes:

To attain, a moister cake and a sweeter version of the cake, mix 2 tbsp honey, 1/4 lukewarm water, and 1 tbsp sugar and generously sprinkle all over the cake.  Use the syrup completely.  The cake will absorb this syrup.  I did this step and it surely enhanced the taste of the cake.

Do not over beat the batter after adding the flour.

I measured the ingredients just until the mark line of the cup (viz., 200 mL/100 mL etc.) and not to the brim.

Saturday, February 6, 2016

Eggless Multigrain Banana and Mixed Nuts Cake

Adapted From:

My Culinary Experiments


Ingredients:

Ripe or Over Ripe Bananas - 4 medium sized (300 gm)

Granulated Sugar - 3/4 cups

Vanilla Extract - 1 tsp

Vegetable Oil - 1/2 cup plus 2 tbsp

Multigrain Atta - 1 cup

All Purpose Flour - 1/2 cup

Cornflour - 1/2 tbsp

Salt - 1 pinch

Baking Powder - 1 tsp

Milk - 2 tbsp

Baking Soda - 1/2 tsp

Vinegar - 1 tbsp

Mixed chopped Nuts (pista, badam, walnuts, cashews) - 1/4 cup

Dark Chocolate Chips - A handful

Method:

1.  Preheat oven to 180 degrees C for 10 minutes.

2.  Grease an 8 inch baking pan on the bottom and all sides with butter and line the base with a disc of butter paper or parchment paper.

3.  Peel skin of bananas and mash nicely without any lumps.

4.  Sieve together the flours, baking powder, corn flour, and salt, preferably 2 to 3 times to make the cake fluffier and aerated.  Keep aside.

5.  In a mixing bowl, add mashed bananas and the oil.  Whisk well together.

6.  Add the sugar and vanilla extract.  Whisk until the sugar is dissolved and well combined.

7.  Add the sifted flour little by little and fold the mixture gently.  Do not whip or vigorously mix.

8.  Pour the milk and fold gently.

9.  Add the chopped nuts and fold gently.

10.  Mix baking soda and vinegar in a small bowl and allow it to foam.  Add this quickly to the cake batter and fold into the cake batter.  The batter will be thick.  Sprinkle the nuts and chocolate chips over it and press slightly with the spatula.

11.  Pour the cake batter into the greased cake tin and spread evenly with a spatula working very gently.  Also, give a gentle tap to release air bubbles if any.  Bake at 180 degrees C for 30 to 35 minutes or until a toothpick inserted in the center of the cake comes out clean.

12.  Allow the cake to cool in the tin for 5 to 10 minutes.  Carefully remove from the tin and flip onto a wire rack.  Peel off the parchment paper and allow the cake to cool down completely and then store in an airtight container.

The cake when done was really soft and sweet with the good flavor of the bananas.  I used ripe robusta bananas for this cake.  I cut the cake into small bite sized pieces for easy use.


Notes:

Cracks may appear on the top of this cake which is quite common, not to panic.  If the cake is becoming very dark, cover the top with aluminium foil.  The baking time and temperature may vary from oven to oven.


Friday, February 5, 2016

Eggless Chocolate Cake (for Blackforest Cake)

Source:

Subhashini Ramsingh, HBG Files Eggless Chocolate Cake

Ingredients:

All purpose Flour - 2 cups
Baking Soda - 1 tsp
Baking Powder - 1 tsp
Salt - 1/4 tsp
Cocoa Powder (unsweetened) - 2 tbsp
Castor Sugar - 1-3/4 cups
Vegetable Oil - 1 cup
Buttermilk - 1 cup
Vanilla Extract - 2 tsp
Vinegar - 1 tsp
Hot Water - 1/2 cup

Method:

1.  Preheat oven to 180 degrees C for 10 minutes.  Grease baking pan with butter or oil and dust with flour.

2.  Sieve together flour, baking soda, baking powder, cocoa powder, and salt.  Keep aside.

3.  In a large bowl, combine sugar and vegetable oil.  Mix in the buttermilk and vanilla extract.

4.  Stir in hot water and vinegar.

5.  Combine the above wet ingredients with the dry ingredients (the sifted flour) a little at a time, mixing after each addition, just until combined.

6.  Pour the batter into the greased baking pan and bake in the middle rack at 180 degrees C for 30 to 40 minutes or until a toothpick inserted in the middle of the cake comes out clean.  Do not over bake as the cake will continue to cook as it cools.

Notes:

This was a super soft cake.  This can be had as such.  Also forms a very good base cake for a blackforest pastry.

I used homemade thick curds to make buttermilk by processing it for a minute in the mixer. 

Thursday, February 4, 2016

Mini Red Velvet Bundt Cake


Inspired By:
blahnikbaker


Ingredients:

All purpose flour - 1-1/4 cups
Sugar - 1 cup
Unsalted Butter - 1/2 cup
Salt - 1 pinch
Egg - 1
Cocoa Powder - 2 tsp
Red Food Color - 2 tsp
Buttermilk - 1/2 cup
Vanilla Extract - 1 tsp
Baking Soda - 1/4 tsp
Apple Cider Vinegar - 2 tsp


Method:

1.  Preheat oven to 180 degrees C for 10 minutes.

2.  Grease the mini bundt pan with butter or oil and dust with flour lightly.  I used a silicon mini bundt mold.

3.  Sift flour and salt together.  Keep aside.

4.  In a small bowl, mix together cocoa powder and the red food color to form a paste.  (I used 1/2 tsp of gel color and 1 tsp of liquid color.  This was not sufficient to make a paste.  So, added a little bit of buttermilk to make a smooth paste).  Keep aside.

5.  In a mixing bowl, cream together butter and sugar until light and fluffy for about 3 to 5 minutes.  

6.  Add egg and beat on slow speed just until combined.

7.  Add vanilla essence and mix by beating lightly.

8.  Add in sifted flour and buttermilk alternately, starting and ending with flour.  Mix until combined.  Beat at low speed.  Do not over mix.  (I used 1/3 cup of homemade thick curds and processed for just few seconds in the mixer jar which resulted in almost 1/2 cup of buttermilk).

9.  Add the cocoa-color mixture to this batter and mix well.

10.  In a small bowl, mix together baking soda and apple cider vinegar.  It will foam up.  Add this immediately to the cake batter and mix well until combined.

11.  Quickly, pour the batter into the mini bundt cavities and tap slightly.  I got 5 mini bundts with this batter.  Bake for 15 to 20 minutes at 180 degrees C in a preheated oven.  Check with a toothpick inserted in the middle.  If not, bake for some more time.

12.  Allow to cool for 10 minutes and then turn on to wire rack to cool completely.

I topped the bright and colorful red mini bundts with cream cheese white chocolate frosting which was a mix up of cream cheese and white chocolate ganache and decorated with silver sugar balls.  They were really soft and yummy with the slightly tangy taste of the cream cheese topping.  Frost and decorate with cream and sprinkles of your choice.  They are tasty as such too. This cake is a little sweeter and would be loved by sweet-toothed people.  If you are not one, try reducing the sugar.


Notes:

The cake is too soft, so it needs much care to take it out of the silicon mold.  Cool down the cake in the mold completely and then remove it very gently.

These mini cakes stay good when stored in the fridge for 2-3 days.  Place out of fridge and bring down to room temperature before serving.

For eggless option: Dry roast flax seeds slightly and powder.  Soak 1 tbsp of flaxseed powder (flaxseed meal) in 3 tbsp of water for 5 minutes.  Run this in a mixer jar for a few seconds to form a jelly-like mixture.  Use this flax meal mixture as a replacement for 1 egg used in this recipe.  This is a great egg replacer.

If you do not have a bundt pan, a normal cake tin for the entire batter or cupcake molds (divide the cake batter) can be used for baking.