Friday, April 28, 2017

Chambakka (Rose Apple) Juice

Chambakka was introduced to me when I visited my friend's house in Mannarkkad a few years back.  I was at first skeptical how it would taste but then liked to munch on it whenever I caught hold of it.  It is grown almost in many backyards of Kerala's houses.  It is citrusy and good to just have them as such or with chilli powder-salt mix (as we have the raw mangoes).

My daughter (GK) helped her friend with her accountancy subject preps for her semesters and in return got a whole lot of chambakka (and some yummy mangoes too).  Munching and munching on, we finished almost half of them but had lots more.

The other options of using chambakka were to make wine, jam, pickle etc.  I had the grape wine and amla wine in stock and wanted no more wine.  I felt it would be apt to make a cool, refreshing juice with the chambakka to beat this hot and scorching summer's heat and I wasn't wrong on thinking so.  Yes, it turned out to be a really good coolant when had it chilled and tasted so good that we couldn't stop with 1 glass of it.


Chambakka is also called the rose apple, wax apple, water fruit, bell fruit, java apple etc.  It is rich in vitamin C and blossoms only in summers.  

Now, let's try this simple recipe.

Ingredients:

Chambakka - 1 kg
Sugar - 1/2 cup
Lemon Juice - 1 to 2 tbsp
Water - 5 to 6 cups
Salt - 1/4 tsp

Method:

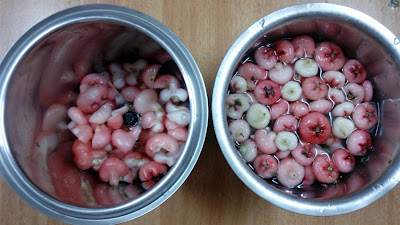
Wash and clean chambakka of any seeds.

Chop them into pieces.

In a mixer jar, add chopped chambakka and about 2 to 3 glasses of water and grind well.


Strain the chambakka puree through a strainer to get clear juice underneath.

To the clear chambakka juice, add sugar, salt, lime juice, and water as needed and run again in the mixie so that everything blends well.  Adjust sugar, water, and salt and also lime juice as per personal taste.

Store in refrigerator until use and serve chilled.  Yummy and cool chambakka juice is ready.

It is really a great refresher and a super cooler.  Don't miss to experience it.  Ah!! It is not be missed!!  

Thanks to GK's friend.  If she had not generously given so much of the chambakka, I wouldn't have tried this at all and would have missed this juicy pleasure.


Notes:

Save and dry the residue (obtained while straining the puree) which can be used as a supplementary addition while making rotis, dosas, etc.

Soak sabja seeds in water and add to the chambakka juice and serve chilled.  An additional coolant it is.  This is optional.


Thursday, April 13, 2017

Rice Flour Stick Vadagam

Come summer and starts the best use of the sun's heat.  This year too I made vadams/vadagams/vadiyaalu/kondattams/crispies (call it either way).  I normally do the easy and simple varieties of them as I would like to do them side-by-side with my morning cooking chores.  I also make them in smaller quantities making it easy to handle and not strain too much on making them as a whole lot.

I normally make rice flour in bulk for this season and store it to be used now and then to make these vadagams.  It comes in handy for many purposes.  Store bought rice flour can also be used.


Ingredients:

Rice Flour - 1 cup
Water - 3.5 cups
Rock Salt - 1 tsp
Gingelly Oil - 1 tbsp

Method:

In a bowl, mix in the rice flour and 2 cups of water to a smooth, flowing paste.  There should be no lumps.  Do this step off the stove.

In another thick bottomed vessel, heat the rest of the water and bring to a boil.  Add the rice flour paste to the boiling water as a continuous stream and keep mixing.  Add the salt and oil and allow to mix stirring continuously.

It will start to thicken and become a thick mass.  It may form lumps, so keep stirring.  We need a smooth, lump free mass of rice flour.

When the thick rice flour cooked dough comes together, becomes shiny to look, and does not stick to your wet hands, switch off the flame and allow to cool.

Mix with the ladle once or twice in between to cool down the dough.   The dough should not be too dry or a tight mass.


When the dough is warm, fill into the murukku press with the single star plate (achu) inside and press into long strips on a plastic sheet or cloth placed on a flat surface.  Since my star achu was not big enough, my baking stuff came handy and I used my piping bag and star icing nozzle to pipe out long strips of the cooked rice flour dough.


Dry them under hot sun's heat until there is no moisture.  When the sides start to turn crisp at the edges, peel and turn over.   Once the other side is also dried, break them into finger long sticks.  Transfer to a broad tray/plate and allow to dry for 1 more day.  I dried them for 3 days totally.


Store in clean, dry container and use as and when needed.  If properly dried, they stay good for a long time.


To fry them, heat oil in a kadai and fry till it puffs up completely.  The oil should not be too hot, else they would darken.


Store the fried vadams in an airtight container and serve with any variety rice or sambar/rasam rice or munch as such.

Notes:

You can add jeera, ground chillies, omum, etc. to the boiling water itself as additional flavors to the vadam and make it spicy too.  We like them plain, so I have not added any of these, just salt.

Adjust salt according to your taste.  The general rule is to use half the quantity of salt for the vadams than what we would use normally for any other dish.  Only then, the fried vadams will be of normal salt taste, else it would be too salty if full quantity to salt is used while making the vadams.

Sago can be also be added to add extra crispiness to the vadams.  Add about 1 to 2 tbsp of sago for this quantity of rice flour.  Soak the sago in 1/4 cup of water for about an hour and grind it in the mixie and add to the rice flour paste and then proceed with the process.  Alternatively, you can add powdered sago to the rice flour and do the vadam.

Happy Summer days!!

Monday, April 3, 2017

Homemade Garlic Powder

I tried to utilize the scorching heat of this summer to the maximum possible by making vadagams/crispies/kondattams/vadiyaalu, black raisins (yes, and I call them as black gold), drying out my pulses, jackfruit seed powder, and so many more.  It is unbearably hot in this part of the earth, but it is the ideal heat for drying up spices, powders, pulses and more.  So, just trying to utilize the energy from the natural resources easily available.


Garlic Powder is normally made by drying it up in a convection oven at 150 degrees or a dehydrator for about an hour or more until it is dry.  Saving on the electricity bills, I have tried using the abundant sun's heat energy available in plenty and at free cost.

Garlic Powder is used as a seasoning or a condiment.  As a condiment, it is used for flavoring mayonnaise, ketchups, salad dressings, gravies, chutneys etc.  As a seasoning, along with other spice powders, it peps up the flavor of potato chips/wafers, crunchies, vegetable stir fries, pasta, etc.  It can also be added to bread to make the classic garlic bread, garlic toast and more.

It surely is not a great substitute for fresh garlic as it has a different taste than fresh garlic.  However, it comes handy as a substitute for fresh garlic @ 1/4 tsp garlic powder equals 1 clove of fresh garlic.


Ingredients:

Garlic cloves


Method:

Peel skin of the garlic cloves.  Cut them into thin slices.


Spread the sliced garlic cloves on a tray and sun dry them for about 5 to 6 days until they are crisp and break with a snap.  If not, keep under the sun's heat for 1 or 2 more days.


Grind the dried garlic slices in a mixer jar to a fine powder.

Store in an airtight container in a cool, dry place.  If storing for a longer time, store it in the refrigerator.


I dried around 250-300 gm of garlic cloves which yielded about 50 gm of the garlic powder.

Just waiting to spice up my crunchies (chips, popcorn, fries, etc. etc.) and snacks with this homemade sun-dried garlic powder.

If making in an conventional oven, place the garlic slices in a 100 degree oven and heat until they are dry and crumble when crushed.

Do give a try of this easy peasy recipe and do utilize the nature's heat energy to the fullest.

Whenever you fall short of fresh garlic cloves, the powdered form can be a good substitute though the taste may be slightly different. Use 1/8 teaspoon of powdered garlic as a substitute for 3 to 4 fresh garlic cloves.

Garlic powder aids in lowering cholesterol levels, boosts immune system, keeps blood pressure under control, contains antioxidants.

Monday, March 27, 2017

Mint Lemonade

Ingredients:

Lemon Juice (squeezed out of fresh lemons) - 1 cup
Sugar - 4 to 5 cups
Water - 3 cups
Fresh Mint Leaves - A handful
Salt - A pinch


Method:

Clean and wash the mint leaves.  Chop finely.

In a large vessel, add sugar and water and allow to boil for around 10 to 15 minutes stirring occasionally.  Remove dirt, if any, floating on top with a spoon.  Alternatively, we can strain the liquid once the sugar is dissolved and then continue to boil the sugar syrup until sticky consistency.

Add the finely chopped mint leaves and allow to boil for 2 minutes more at low medium flame.  If desired, add a few drop of mint flavor (I did not add, wanted it the natural way).

Remove from the stove top and allow the sugar syrup to cool completely.

Mix in the lemon juice and stir until combined well.


Mint lemonade is ready to be stored in cleaned, washed, and dried or sterilized glass bottles.  This lemon mint syrup stays good in the fridge for up to a month.

While serving, pour the lemon mint syrup to around a quarter of the glass and fill the rest with plain cold water or soda water (I use the clay pot water - gives natural chillness to your drink).  Mix with a spoon and serve immediately topped with ice cubes if desired.


A cool, refreshing mint lemonade with specks of greenery here and there is the best thing to have in hot summer days.  Replenishes instant energy to our body.


Do give a try to this easy, simple, and natural mint lemonade recipe.


Notes:

Adjust sugar according to your taste.

While serving, the syrup to water ratio can be varied according to your personal taste. 

Add a pinch of jeera/cumin powder to the lemon mint juice while serving if desired. 


Sunday, January 15, 2017

Raw Papaya Manchurian

A spicy Indo chinese dish that I had to give a try when raw papayas were in plenty at home - got around 3 to 4 big papayas from my mom's place.


Ingredients:

For the Koftas:

Raw Papaya (medium sized) - 1/2
Onion - 1/2
Ginger Chilli Paste - 1 tsp
Powdered Salt - 1 tsp
Maida - 1/2 cup
Rice Flour - 1 tbsp
Oil - To deep fry

For the Manchurian Sauce:

Onion - 1 (finely chopped)
Corn Flour - 1½ tbsp
Soya Sauce - 1½ tbsp
Worcestershire Sauce - 1½ tsp
Tomato Sauce - 1 tbsp
Sugar - 2 tsp
Pepper Powder - 1/2 tsp
Tomatoes (medium sized) - 3 (make paste)
Coriander Leaves (finely chopped) - 1 tbsp
Oil - For frying

Grind Together:

Ginger - 1 inch piece
Garlic - 4 flakes
Red Chillies - 7
Onion - 1 


Method:

1.  Soak red chillies for 10 minutes in warm water and grind with roughly chopped onion, ginger, and garlic to a smooth paste.  Set aside.

2.   Wash, cut, peel, and grate the papaya using a large-eyed grater.

3.  Mix finely chopped onions, ginger chilli paste, salt, rice flour, and maida to the grated papaya.

4.  Make small lemon sized balls and deep fry in hot oil until golden brown.  Drain excess oil and keep aside.

5.  To make the manchurian sauce, heat oil in a kadai or a shallow frying pan.

6.  Add 2 tsp of sugar in the oil and allow to caramelize.

7.  When it turns golden, add the chopped onions and fry in high flame for few minutes.

8.  Add the ground red chilli paste and stir well.

9.  Pour the tomato paste and allow to cook for few minutes.

10.  Add salt, pepper powder, the sauces, and corn flour diluted in 1½ to 2 cups of water.

11.  Stir well till it becomes like a thick sauce.

12.  Add the deep fried papaya balls and cook for a minute.  Then, transfer to a serving bowl and garnish with finely chopped coriander leaves.

Serve hot with rotis or fried rice.


Notes:

Vegetable Marrow (Suraikai or Lauki) can be used in this recipe instead of raw papaya.

Aji-no-moto can be added both in the kofta balls and also the manchurian sauce.  I did not use.

Replace chopped spring onion tops to garnish instead of chopped coriander leaves.

(Recipe adapted from Mrs. Mallika Badrinath's Delicious Vegetarian Curries Marrow Manchurian.)

Adjust salt and spices according to your family's taste.  We like the hot and spicy way.

Other raw papaya recipes that you can give a try 

Homemade Tutti Fruiti

Raw Papaya Caramel Muffins

Happy Cooking!!